,fit(cover),quality(100)/https%3A%2F%2Ftrackercdn.com%2Fghost%2Fimages%2F2023%2F3%2F12727_2023_Root_of_Nightmares_Raid_PressKit_Gear_16x9_Compressed_005.jpg/image.jpg)
Full Root Of Nightmares Raid Guide
OPENING:
Welcome, Guardians! Are you ready to take on the challenge of RON? As you spawn in at the entrance, gear up and get ready to start your journey. Your first task is to make your way to the root of the raid. Head down the stairs and keep your eyes peeled for the path on your left. Don't worry, the path is pretty straightforward with plenty of enemies along the way to ensure you're on the right track. Stay focused, stay alert, and get ready for what's to come!
CATACLYSM:
Recommended Loadouts
Hunter - Strand, Void Mobius Quiver
Warlock - Solar Well, Nova Bomb, Strand
Titan - Void Ward of Dawn, Strand, Solar Hammer of Sol
Weapons:
Exotics: Osteo Striga (Enemy Clearing), Witherhoard (Enemy Clearing), Thunderlord (Tormentor Melting)
Other Great Enemy Clearing Options: Salvager’s Salvo, Funnelweb (With Volatile Rounds),
Welcome to the first encounter of the Root of Nightmares. Here you will want to separate into two teams, one team of two and a team of four. The team of two is the Linker team while the team of four is the Destroy team.
Linker role -
Linkers will be responsible for interacting with the seeds of light. Stand in the glowing white orb and shoot the seed. Once destroyed a small beam of light will point to where you need to go, it will look like a platform with a spiral conflux spinning on it. Once on the platform, you will create a little black goo ball that you need to shoot with the light buff you were given by the seed. Your team’s goal is to chain the seed of light to all of the platforms in a quadrant of the battlefield while your Destroy team stops the timer from reaching zero. After you connect 4-5 of the light nodes, the time will go away and you will move on to the next section of the battlefield. The arena is broken into four sections, hence why you do the encounter four times, so remember you shouldn’t be traveling to a conflux on the opposite end of the battlefield, it should be relatively close.
Destroy role -
Destroyers are essential just that, destroyers. Once the encounter starts everyone will be given “Sweeping Terror” debuff which will wipe your team if the timer hits zero. To extend the timer, Destroyers need to locate two Psions on the field and melee them. Once killed, the Psions will call forth a Tormentor and a Barrier Champion. These two bosses will always be on opposite sides of the map (Left or Right). You need to destroy the Tormentor as soon as possible, once defeated the Tormentor will extend your “Sweeping Terror” debuff which prevents the wipe mechanic. Continue to bring down Tormentors to allow your Linkers more time to connect nodes. It is possible to get your debuff timer over a minute if your team feels it is necessary.
Possible Loot:
- Chest Armor
- Arms Armor
- Helmet Armor
- Briar's Contempt - Linear Fusion Rifle
- Koraxis' Distress - Grenade Launcher
- Nessa's Oblation - Shotgun
.jpg)
SCISSION:
Recommended Loadouts
Hunter - Strand, Void Mobius Quiver
Warlock - Solar Well, Nova Bomb, Strand
Titan - Void Ward of Dawn, Strand, Solar Hammer of Sol
Weapons: Any
This encounter functions very similarly to Cataclysm, however instead of just having a seed of light there is now also a seed of dark. You will need to split into two teams of three which each team having a “runner.” Both runners will be working together to beat the “Imminent Expulsion” timer which will wipe your team if it hits zero.
Each runner will grab their team’s buff by shooting their respective seed within the aura of the seed. They will then need to use the levers to shoot across the gap and find their first node to shoot. The runners will then return back to their side, re-grab their buff, and then shoot a node on their own side. Light and Dark have separate nodes on each side that need to be shot, you will not see the opposite team’s “goo orb” so don’t worry. Continue this zig-zag pattern till you have shot a total of 5 orbs. Once both teams are finished, the timer will halt and a miniboss will spawn on both sides. Defeat the miniboss and use the last launcher to go up to the next floor. You will do this for three floors.
It's crucial to note that some enemies will be shielded in either light or darkness. Have a non-runner player join the runner periodically to collect the buff, so the rest of the team can focus on defeating the adds and lessen the runners' workload. Lastly, only the runners should shoot the seeds, as shooting by anyone else will remove the shooter’s buff and prevent them from shooting the next node.
Possible Loot:
- Chest Armor
- Arms Armor
- Leg Armor
- Mykel's Reverance - Sidearm
- Koraxis' Distress - Grenade Launcher
- Acasia's Rejection - Trace Rifle
- Nessa's Oblation - Shotgun
Jumping Puzzle:
This jumping puzzle is not much of a “puzzle” as it walks you forward by following seeds of light and dark. The secret here is to grab a buff from the seed of light and then use that buff to shoot a dark seed. This will give you the buff of “Darkness Refugee” which will protect you from the waves of darkness that can periodically wipe you from the pyramid. Keep working your way through the pyramid and follow the clusters of enemies spawning to lead you in the right direction.
MACROCOSM:
Hunter - Void Mobius Quiver
Warlock - Solar Well, Nova Bomb
Titan - Void Ward of Dawn
Exotics:
Because DPS is “gated” in this encounter you can use quick damaging strategies like Divinity / Inzanagis, Gjallhorn, Two-Tailed Fox. You can also use Witherhoard for enemy clearing and strong Void LMGs with Volatile rounds (Commemoration or Corrective Measure).
Welcome to your first boss fight of Root of Nightmares. Macrocosm is just as involved as it is breathtaking. I made a map to help visualize the explanation of the encounter below:
.jpg)
Split the room into three parts to help understand the layout of this area. You have the Light side (left side), DPS Area (Middle arena), and Dark side (right side). You will see there are two triangles on each side of the arena, each of these triangles have a planet floating above each of their points. THESE ARE THE PLANETS YOU WILL BE INTERACTING WITH. There are three planets in the DPS Area (Middle arena) these are symbolic planets and you will only use these are references later on. Divide into two teams of three again: Light team and Dark Team. Each team will need a far runner, a closer runner, and one Seer.
When the encounter starts there will be enemies spawning in the back. Notably, two Centurions will spawn in the back. Once killed they will spawn one Colussus on each triangle in the room. Have your Seer get the final blow on a Colussus and they will be able to see the affinity of each planet. One planet on each triangle will not match the side it is on.
For example, the dark side triangles will have two dark planets and one light planet. The light side triangles will have two light planets and one dark planet. The goal of the runners is to interact with the planet on both sides that don't belong. I made an example of what a Seer could see below:
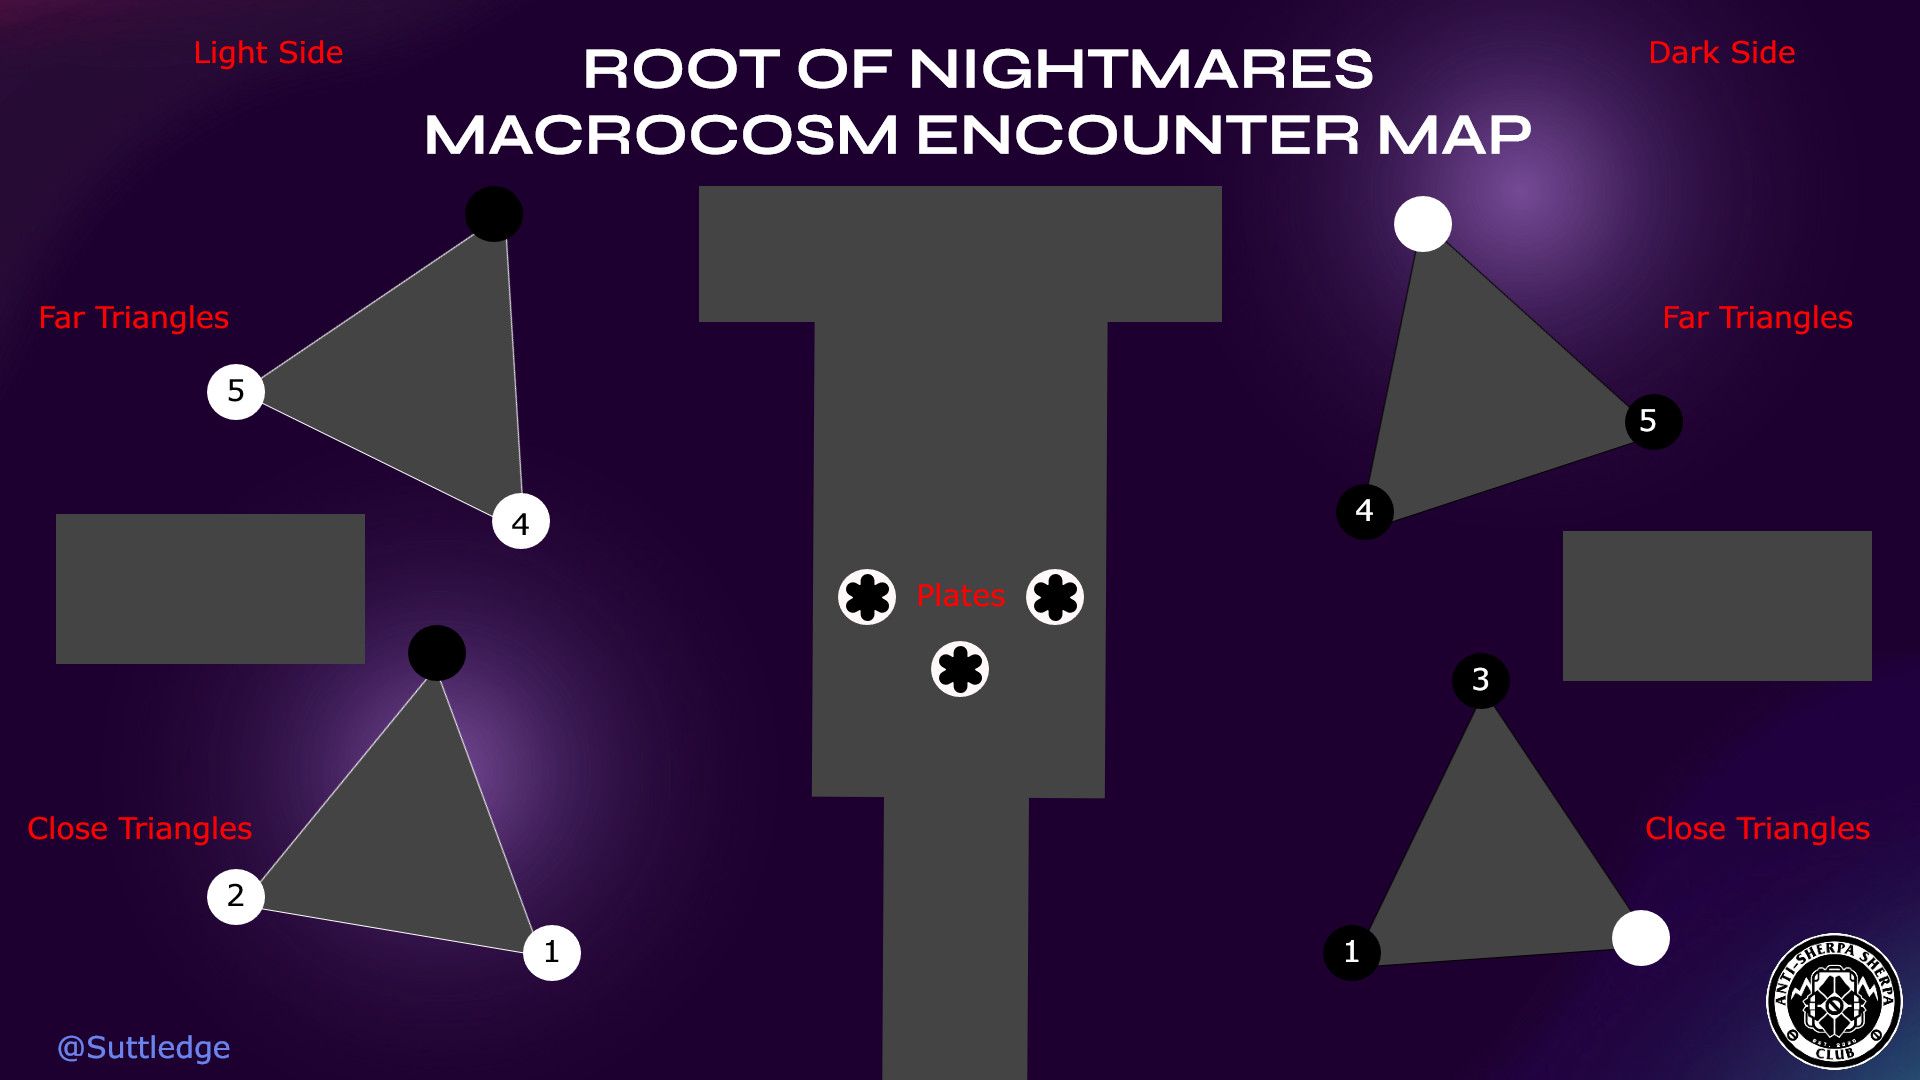
In this example, the Close Light side runner will need to interact with planet 3 on the light side and 2 on the dark side. The Close Dark side runner will need to interact with planet 3 on the light side and 2 on the dark side. The Far Light side runner will need to interact with planet 6 on the light side and 6 on the dark side. The Far Dark side runner will need to interact with planet 6 on the light side and 6 on the dark side. Once all four runners have interacted with their set of planets, the planets will rotate and the next step will begin.
Again, Centurions will spawn that will summon Colussus on each triangle. Let the Seer get the final blow so they get the ability to see the affinity of the planets once more. First, they will want to make sure all six of their planets are the same affinity. If this is correct, they will need to move to the middle of the arena and the three planets in the middle should now be glowing. Two will always be one color with the third being the odd one out. Three runners will need to interact with one of their planets and then interact with a corresponding plate.
Example:
The Seer notices in the middle arena there are Two Light Planets and One Dark Planet. The left plate has a Light Planet. The Middle plate has a Light Planet. The Right plate has a Dark planet. Two runners from the light side will need to interact with a planet on their side (one from each triangle only) and then interact with separate Plates. One runner from the dark side will need to interact with a planet and then interact on the right plate. Once this is done the planets will eventually move to the middle and the boss will start to glow. Because there are two light planets you will need to start DPS on a “Light Plate” have your team stand on that plate and when the boss’ shield turns white, shoot the pyramid level above his head and begin doing DPS. Once he goes immune, you need to move to the opposite color plate. In this example, you would move to the right. Do DPS again and then move to your final plate. Then rinse and repeat this whole process until the boss is dead. If you manage to enrage the boss, all the plates will turn dark and you will have one final set of three plates to finish out DPS.
Possible Loot:
- Chest Armor
- Class Item Armor
- Leg Armor
- Mykel's Reverance - Sidearm
- Rufus's Fury - Auto Rifle
- Acasia's Rejection - Trace Rifle
NEZAREC:
MACROCOSM:
Hunter - Void Mobius Quiver, Strand, Solar Golden Gun
Warlock - Solar Well
Titan - Void Ward of Dawn, Arc Thundercrash
Exotics:
There are many great strategies to quickly defeating Nezarec. Use what your team is most comfortable with.
1x Two-Tailed Fox with catalyst + 1x Gjallarhorn + 1x Divinity + 3x Legendary Rocket Launchers
1x Tractor Cannon + 5x Lament
1x Divinity + 5x Thunderlords (Must Have Catalyst)
There are even more but these are the most successful DPS outputs I have seen.
And now for the moment you have been waiting for, Nezarec the Final God of Pain. Frankly, Nezarec is much easier than the previous encounter you just completed. If you made it this far you are sitting in a great spot.
Similar to most encounters in this raid, you will need to split into two teams. Light side and Dark side with one runner each. The other two Guardians on each team will be responsible for enemy clearing and shooting Nezarec’s crit spots.
The runner for each team will notice they have a seed of their respective affinity. They will do exactly what they have done in many past encounters by chaining their nodes to their respective buff. An important note here is that runners will only have to work on their side of the map, there are no cross-map nodes luckily. Once all the nodes are connected, DPS will begin pretty much wherever Nezarec is at. My team found it best to connect all the nodes and for everyone to pile on the flower on the far back light side. Nezarec then goes over to the flower, is hit by an orange vulnerable burst from the pyramid, and is able to be damaged.
It is truly this simple however there are a couple of factors that can complicate the final boss a bit. First, Nezarec has two wipe mechanics that he can do at mostly unpredictable moments. The first can happen if he is left up on his platform too long. To get him down Guardians will need to shoot his stomach and shoulder crit spots to get him to jump down into the arena. Once you do this he will, however, randomly start attacking players. If your team is dying to him too much, you can have one player use a glaive to block Nezarec's destructo disc attacks.
For the second wipe mechanic, watch the color Nezarec’s body tattoos(?) turn when his crit spots are hit. If his body turns white it means he will send out a light blast and the opposite if his body turns orange. If the runners take too long with the nodes, Nezarec will shoot this blast out of his body and wipe the team. There is one way to live through this wipe mechanic and I believe it is the way the encounter was actually designed to be done. When you see the color of Nezarec’s body, have a player create a refugee of that corresponding affinity.
For example, Nezarec has an orange glow in his body, which means there will be a darkness burst from him at some point. Once the runners connect about 3-4 nodes, have the light runner get their light buff and shoot a non-glowing dark seed. Like in the jumping puzzle, this will create a darkness refugee that players can use to survive the blast. Use a dark buff on a non-glowing light seed to get the opposite result. This refugee mechanic is able to be bypassed if you have a pair of speedy runners but most teams have found that this mechanic is a more sure-fire way to ensure completion.
Possible Loot:
- Leg Armor
- Helmet Armor
- Any Weapon
- Conditional Finality Exotic
I hope this guide helped you get your completion and as always if you have any questions shoot me a message on Twitter!
Were you able to beat Nezarec? Let me know in the comments below or on Twitter @Suttledge
,fit(cover),quality(80)/https%3A%2F%2Fcms.tracker.gg%2Fcontent%2Fimages%2F2025%2F07%2Fgeneral-dungeon-race_16x9--2-.png/image.jpg)
,fit(cover),quality(80)/https%3A%2F%2Ftrackercdn.com%2Fghost%2Fimages%2F2024%2F4%2F151242_IMG_0244.jpeg/image.jpg)
,fit(cover),quality(80)/https%3A%2F%2Ftrackercdn.com%2Fghost%2Fimages%2F2024%2F1%2F11129_IMG_1548.jpeg/image.jpg)
,fit(cover),quality(80)/https%3A%2F%2Ftrackercdn.com%2Fghost%2Fimages%2F2023%2F12%2F15243_2023_Warlord_s_Ruin_Dungeon_Press_Kit_Dungeon_COMPRESSED_005.jpg/image.jpg)
,fit(cover),quality(80)/https%3A%2F%2Ftrackercdn.com%2Fghost%2Fimages%2F2023%2F10%2F41948_EN_Bungie_TheFinalShape_S3_2560x1440_2560x1440-9bdaae3a03394737c6fddecd62f00a70.jpg/image.jpg)
