,fit(cover),quality(100)/https%3A%2F%2Ftrackercdn.com%2Fghost%2Fimages%2F2020%2F11%2F2339_mpZe3Y1N.jpg/image.jpg)
Deep Stone Crypt was not only one of the most visually stunning Raids introduced to Destiny 2, but it is also one of the most mechanic heavy. Here is your guide on how to complete
The Start
The beginning of the raid throws you into the icy tundra of Europa. For this section you are going to navigate from heat bubble to bubble, ensuring you do not die of the Frostbite debuff. You will die if your Frostbite debuff reaches 10 stacks, but if you are inside the bubble your stacks will go down. Continue through the ice until you reach a squad of Fallen and Brigs, defeat these and enter the Crypt.
The Firewall
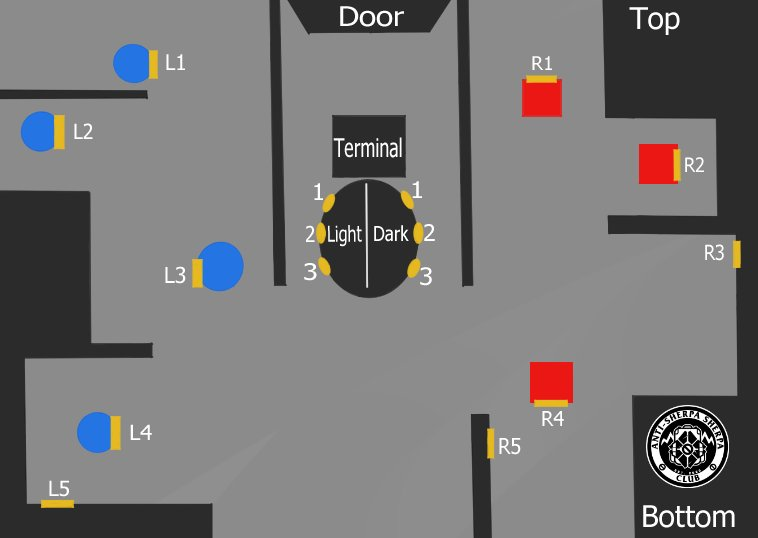
The first encounter of the raid will have you disabling the security system of the Crypt. For this section, there are going to be two buffs Scanner and Operator.
The easiest and foolproof way to do this encounter is to split your team into two teams of three. Three in the Light room, three in the Dark room.
1. One player in the Light room will collect the operator buff that looks like a red glowing icon. They will make their way to the back of the room and go through the locked doors by hitting or shooting the keypad till they are down in the basement. Only the person with the Operator buff is able to interact with these keypads.
2. Once the encounter begins players will need to focus on killing enemies till they find the one with a glowing icon, this is the Scanner. Defeating the Scanner will allow a player to pick up the buff which will let them see glowing keypads through the glass on the floor.
3. Call out two on your side and the player with the Operator buff will be tasked with disabling those keypads. Once your two keypads are disabled the player with the Scanner buff will need to pass it to the other room using the Augment Station. This will allow for the team in the other room to call out their two keypads.
4. Once all four keypads have been disabled the Operator will need to bank their buff so someone upstairs can grab it. At this point, they will need the Scanner buff so they can tell their team how to do the damage phase.
5. The player downstairs will be able to see six fuse tubes above the terminal that relate to the glowing tubes upstairs, call out the glowing fuse so all players know which tube to shoot. Use the Operator buff upstairs to keep the team together for maximum DPS. This can be a 1-2 phase encounter.
Here is my clan’s map made by @Nox_Aeterno feel free to use this for calling out keypad locations. (@AntiSherpaClub)
Atraks-1 The Fallen Exo
Welcome to the Day One killer. This is the encounter that hung up the most teams and proved to be the most difficult with Contest Mode on. Now the encounter seems to be a breeze for most organized teams and here is how you can breeze through it too.
1. Separate into two teams, Satellite and Crypt team. At the start of the encounter two members of Satellite team will immediately launch up to begin clearing enemies while the third stays down to wait for the operator buff.
2. Once the Operator has their buff and is in the satellite begin to kill servitors until the Scanner spawns in the satellite room. Once the last servitor is killed the mechanic will start so do not finish the last one until the Scanner has their buff.
3. The Scanner will be tasked with calling out which copy of Atraks is glowing. The team will need to do as much damage to this copy and the residual cloud until it drops a Replication Debuff.
4. Once Satellite teams’ Atraks copy is destroyed pass the Scanner buff down to the Crypt via the terminal so the next team can kill their copy and bring their debuff to space.
5. While this is happening the Operator needs to make sure no ones debuff expires by shooting their teammates which will drop and recharge the debuff that a player will need to pick back up.
6. Once there are four debuffs in the Satellite the Operator will need to shoot the four players in an airlock and drop their buffs to be sucked into space. Players will need to run against to pull to ensure they are not vacuumed out.
7. Doing this enough times will trigger Atraks-1’s last stand where all players will need to be in space to shoot the glowing copies till enough damage is done to kill the boss.
Descent
This jumping puzzle is pretty straightforward. Follow the path to the end to get back inside the station. A secret chest can be found on a platform out to the left but other than that, enjoy the quiet time.
Taniks - Rapture Room
The room where you first confront Taniks does a great job on building on your prior skillset. This room will add a new buff called Suppressor that has a blue hue to it.
1. Split into a buff team and a run team. Three players on each team.
2. Collect the three buffs that spawn on enemies throughout the room.
3. Scanner will tell the runners which bins are accepting the nuclear cores each round. Operator will summon the cores by shooting a keypad when the time comes to summon cores. The Suppressor will move under the three white drones and shoot Taniks to stun him to allow the cores to be deposited.
4. Run team will need to move the cores between the three of them to ensure no one gets a stack of 10. Once they bank their core, a random buff will be disabled and a runner will need to take the role of the other team via the Augment terminal.
5. Rinse and repeat this until a hatch opens in the middle of the floor, immediately jump down and sprint to the end of the room where you will await the crash.
Taniks the Abomination
This final boss, like many, combine all of the previous mechanics into one final stand against Taniks.
1. Split into three teams of two, Spawn, Blue, Orange. Each team will station themselves at the corresponding location in the are. Spawn team will be Operator team, Blue team will be Scanner team, and Orange team will be Suppressor team.
2. One person on each team will need to hold the buff to do their teams’ role while the free member moves cores to bins across the map.
3. Like last time Scanner will call out bins, there are two on each area and you can refer to them as left or right bins while Suppressor disables Taniks by shooting under the drones he is closest to. Operator is the only role with a new mechanic, they are tasked at shooting any team member that gets encased in Taniks purple sphere to break them out. Once Suppressor finishes stunning Taniks one random buff will be deactivated and will need to be given to their teammate via the Augment Terminal. Wait to stun till after two people have been freed by the Operator it will ensure Operator will not loose their buff while people are dunking orbs.
4. To get the cores shoot Taniks’ glowing orange cores when they light up. You will know this mechanic has started when he starts hurling purple astroids from the sky. Avoid these.
5. Once two cores are blown out, players without role buffs need to work together to bank them in the designated bins. Once four are banked the damage phase will begin.
6. You will need to stand in between the two circles Taniks spawns around him in the middle of the room. Avoid the debris circling but do not get too close or you will take a ton of Arc damage. I recommend Divinity and Xeno for the most accessible and easy damage phase.
7. Rinse and repeat this until you are done and trigger the last stand where Taniks teleports around the area till you do enough damage to defeat him.
What did you think of the Deep Stone Crypt? Let me know in the comments or @Suttledge on Twitter.